ULTIMATE THERMAL PASTE APPLICATION METHOD TEST
RESULTS FROM THERMAL PASTE APPLICATION TESTING:

Project Name:
“PASTE”
Paste Application Scientific Testing & Experimentation
Table Of Contents:
- ULTIMATE THERMAL PASTE APPLICATION METHOD TEST
- Project Name:
- "PASTE"
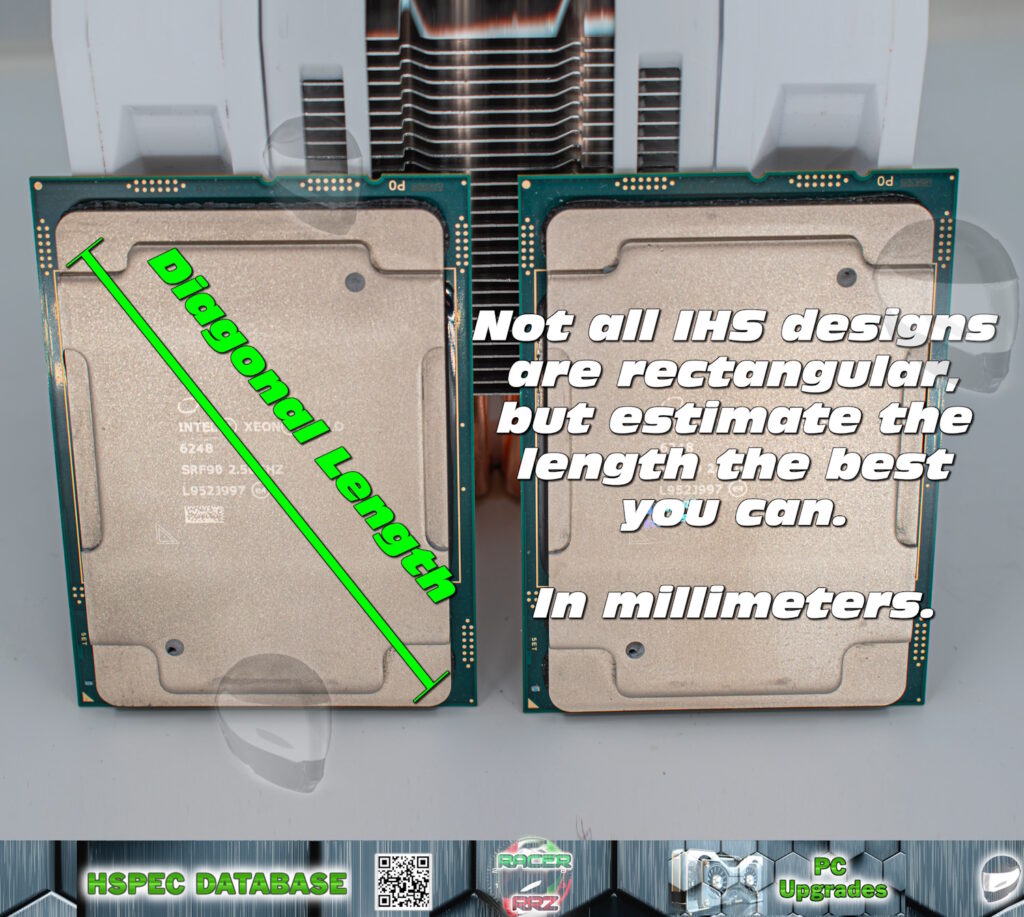
- 1.) TPVC : Estimates the required volume of paste to fully cover the IHS surface area.
- Thermal Paste Volume Calculator
- 2.) Why Do We Need Thermal Paste?
- 3.) Which Type Of Paste Is Best?
- 4.) How Do I Apply Thermal Paste?
- 5.) What Happens If I Get It Wrong?
1.) TPVC : Estimates the required volume of paste to fully cover the IHS surface area.
Thermal Paste Volume Calculator
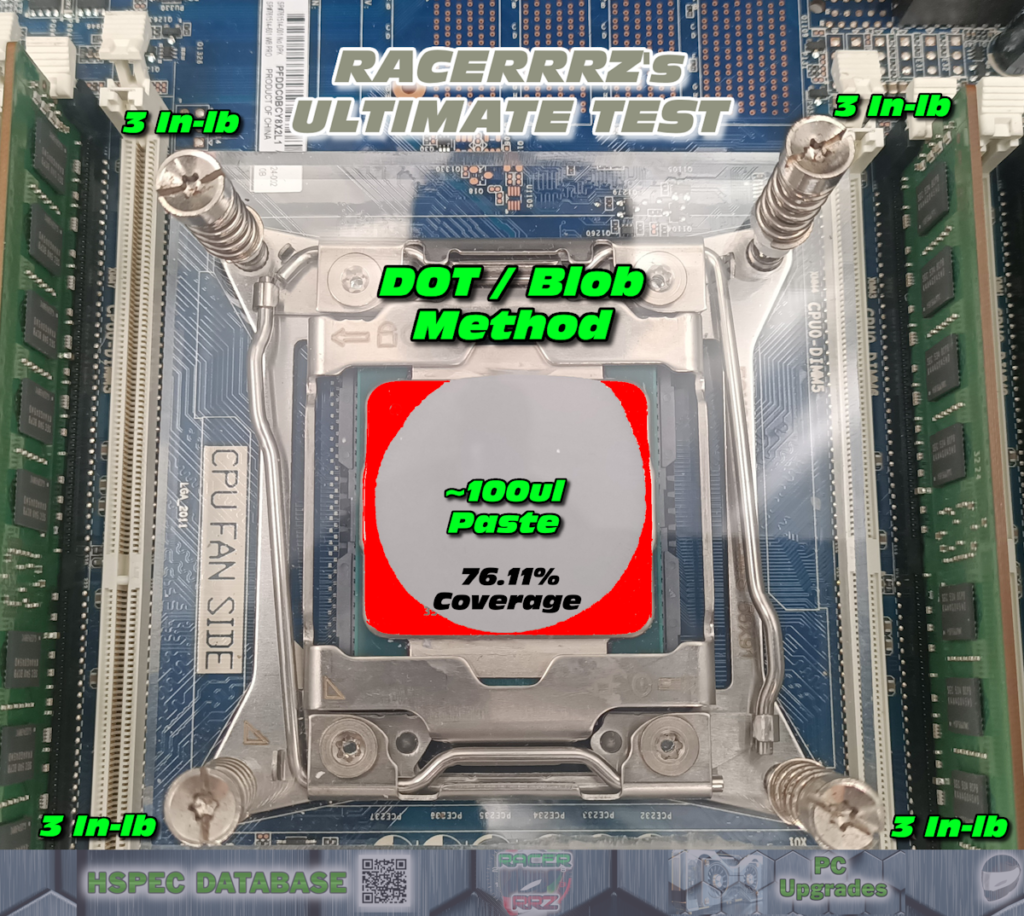
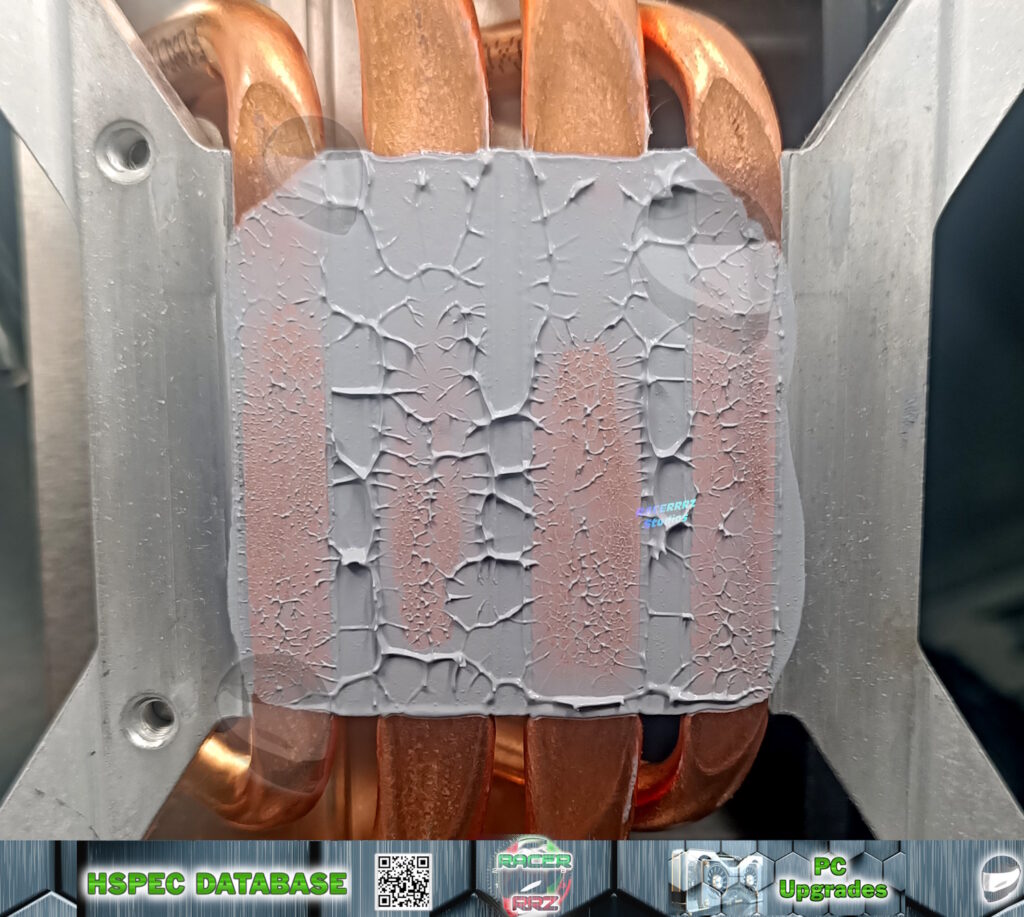
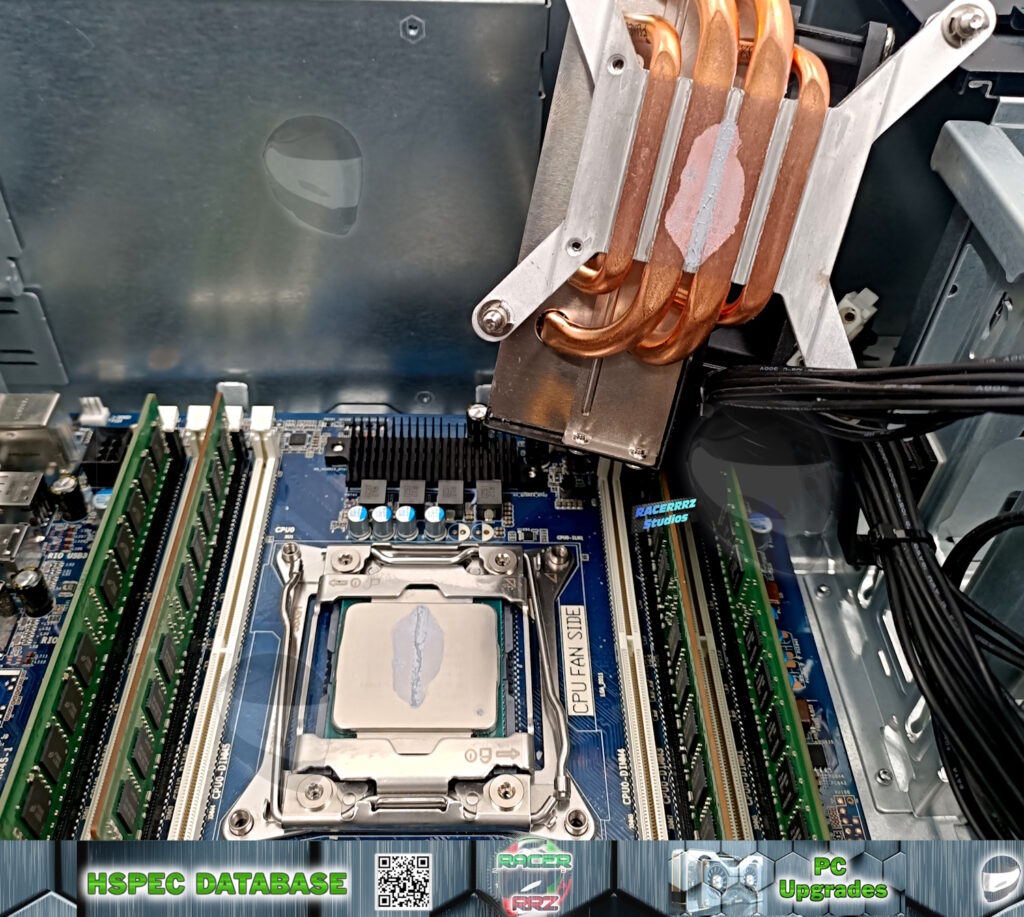
This volume estimate intentionally errs on the side of slight excess to accommodate inconsistencies in application methods. Techniques like Dot, X-pattern, or Line may result in incomplete spread if volume is too low.
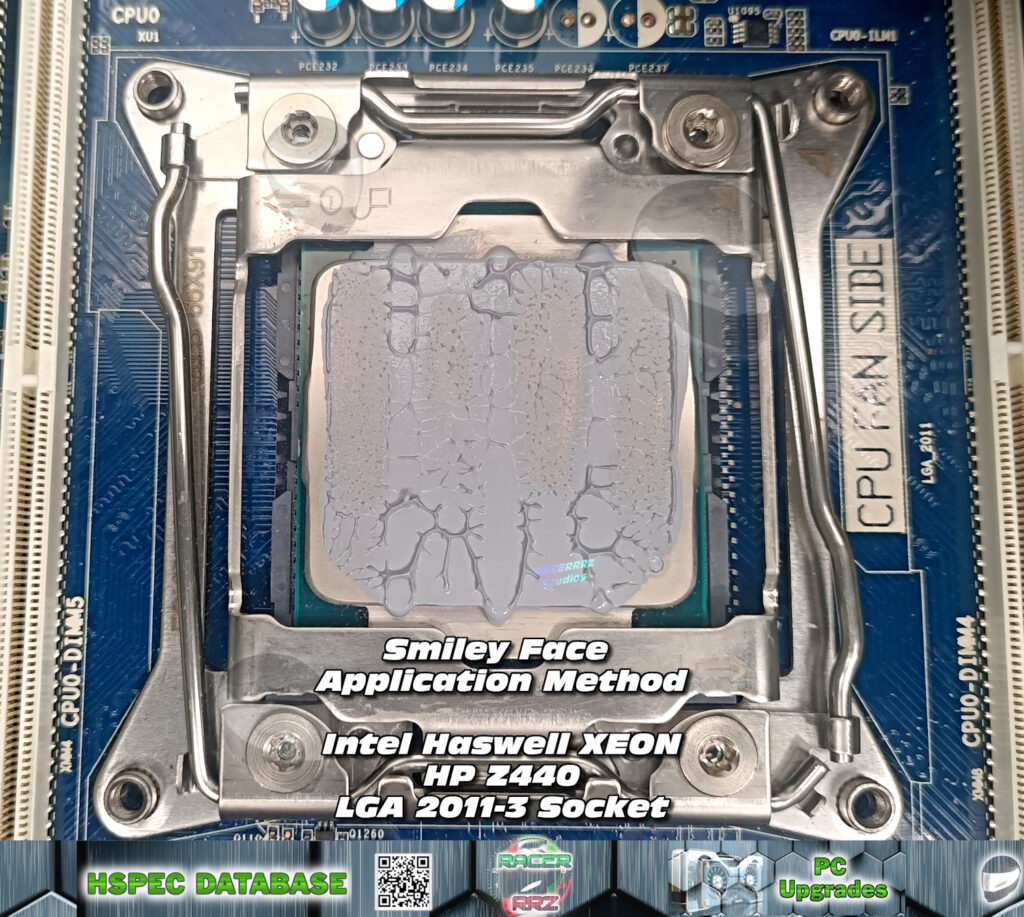
For best results, use a precision torque screwdriver to ensure even pressure across the CPU cooler, avoid lifting and reseating the heatsink after initial contact, use a spreader to manually spread the paste. If in a rush – Smiley Face application yielded a good outcome in my testing. Excessive paste can lead to overflow and potential short circuits (if electrically conductive); inadequate paste can cause hotspots.
For a step-by-step guide on effective application methods, please watch my YouTube tutorial on thermal paste application.
2.) Why Do We Need Thermal Paste?
What Role Does Thermal Paste Play?
Efficient thermal management is fundamental to maintaining the performance, longevity, and reliability of modern computing systems. The CPU (Central Processing Unit), as the primary processing unit, generates substantial heat due to the high-density switching of transistors. This heat must be dissipated efficiently to prevent thermal runaway, performance degradation, and hardware failure.
The Problem: Imperfect Contact Between CPU and Heatsink
The interface between the CPU’s integrated heat spreader (IHS) and the heatsink is theoretically designed for direct heat conduction. However, in reality, these surfaces are not atomically flat. Under microscopic examination, even precision-milled surfaces exhibit irregularities that create air gaps when placed in contact. Since air has an exceptionally low thermal conductivity (~0.025 W/m·K) compared to metals, these voids act as insulative barriers, significantly impeding heat transfer.
To illustrate, imagine stacking two sheets of glass together—although they may appear smooth, small imperfections prevent full contact. Without an interface material, heat conduction occurs inefficiently due to these discontinuities.
The Solution: Thermal Paste as a Conductive Interface Material
Thermal paste, or thermal interface material (TIM), serves as an intermediary layer that displaces air and provides a path for efficient thermal conduction. High-quality TIMs exhibit thermal conductivities ranging from 2 W/m·K (silicone-based pastes) to over 70 W/m·K (liquid metal alloys), orders of magnitude higher than air.
This ensures heat is efficiently transferred from the hot surface of the CPU to the heatsink, where it can be dissipated via conduction and convection. Without thermal paste, thermal resistance at the interface increases, leading to higher operating temperatures, thermal throttling, and in extreme cases, CPU failure due to thermal stress.

Critical Properties of an Effective Thermal Paste
An optimal thermal interface material should exhibit the following properties:
- High Thermal Conductivity – Facilitates rapid heat transfer between CPU and heatsink.
- Low Thermal Resistance – Ensures minimal impedance to heat flow.
- Stable Viscosity & Spreadability – Conforms to surface irregularities without excessive bleeding.
- Non-Corrosive & Electrically Insulating (except in the case of liquid metal pastes).
Consider the analogy of water between two glass panes: a thin, evenly spread layer facilitates better adhesion than trapped air pockets. Similarly, thin and uniform application of thermal paste maximizes heat conduction while minimizing thermal resistance.
Implications of Poor or Absent Thermal Paste
Failure to apply thermal paste properly leads to a steep rise in CPU core temperatures, which may trigger:
- Long-Term Material Fatigue – Repeated overheating can accelerate electromigration and degrade silicon integrity.
- Thermal Throttling – The CPU downclocks to reduce power consumption and heat output.
- System Instability & Crashes – Thermal expansion and contraction cycles can degrade electrical contacts.
Conclusion
In essence, thermal paste functions as an indispensable thermal conduit, mitigating microscopic imperfections and ensuring optimal heat transfer efficiency. As modern CPUs continue to push the boundaries of power density, the role of high-performance thermal interface materials becomes increasingly critical—not only for maintaining stability but also for maximizing computational efficiency and hardware longevity.
3.) Which Type Of Paste Is Best?
Selecting the optimal thermal interface material (TIM) is crucial for efficient heat dissipation in computing systems. The best choice depends on several factors, including thermal conductivity, electrical conductivity, longevity, and application constraints.
Categories of Thermal Pastes
Thermal pastes are broadly classified into three main categories based on their composition:
- Metal-Based Thermal Pastes
- Composition: Typically contain micronized silver, aluminum, or gallium-based alloys.
- Thermal Conductivity: 8–15 W/m·K for standard metal pastes; >70 W/m·K for liquid metal compounds.
- Advantages:
- High thermal conductivity, making them ideal for high-performance CPUs and GPUs.
- Long-lasting compared to some silicone-based alternatives.
- Disadvantages:
- Many metal-based pastes are electrically conductive, posing a short-circuit risk if spilled onto motherboard components.
- Some (e.g., gallium-based) are corrosive to aluminum and should only be used with copper heatsinks.
- Best For: Overclocking, high-performance workstations, and liquid-cooled systems.
- Ceramic-Based Thermal Pastes
- Composition: Contains non-conductive ceramic particles (e.g., zinc oxide, aluminum oxide, boron nitride) suspended in a silicone-based carrier.
- Thermal Conductivity: Typically ranges from 2–8 W/m·K.
- Advantages:
- Non-conductive, eliminating short-circuit risk.
- More stable over time compared to metal-based pastes.
- Easier to apply and clean.
- Disadvantages:
- Lower thermal performance than high-end metal-based or liquid metal TIMs.
- Best For: General consumer applications, laptops, and moderate-performance desktops.
- Carbon-Based Thermal Pastes
- Composition: Utilizes carbon nanotubes, diamond powder, or graphene-enhanced compounds for enhanced thermal performance.
- Thermal Conductivity: Typically 5–12 W/m·K, depending on formulation.
- Advantages:
- Non-conductive and non-corrosive.
- Higher thermal performance than most ceramic-based pastes.
- Long lifespan; does not dry out as quickly as silicone-based TIMs.
- Disadvantages:
- Higher cost compared to standard thermal pastes.
- Best For: High-end consumer PCs, gaming rigs, and long-term applications.
- Liquid Metal TIMs
- Composition: Primarily made of gallium, indium, and tin alloys.
- Thermal Conductivity: >70 W/m·K, significantly higher than traditional pastes.
- Advantages:
- Best-in-class heat transfer, essential for delidded CPUs or extreme cooling setups.
- Disadvantages:
- Electrically conductive, posing a high risk of short-circuits.
- Corrodes aluminum surfaces; must be used exclusively with copper heatsinks.
- Difficult to apply and remove.
- Best For: Delidding, high-end overclocking, and enthusiast liquid-cooled systems.
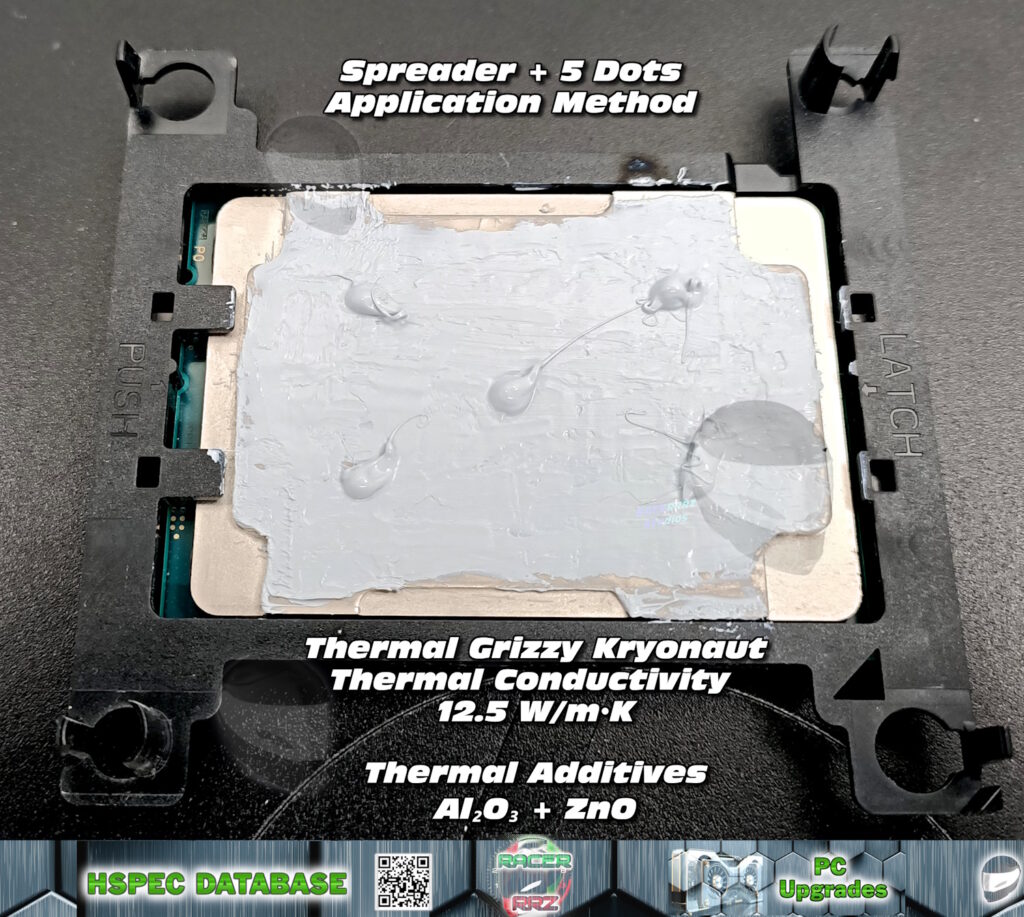
Personally - I have settled on Thermal Grizzy Kryonaut as my ideal go to thermal paste.
For a list of Thermal Grizzy paste offerings: https://www.titanrig.com/blog/post/thermal-grizzly-thermal-paste-buyers-guide
4.) How Do I Apply Thermal Paste?
Applying thermal paste correctly is crucial for ensuring optimal heat transfer between the CPU (integrated heat spreader, or IHS) and the heatsink. Improper application can lead to air pockets, uneven heat distribution, and increased thermal resistance, all of which negatively impact cooling efficiency.
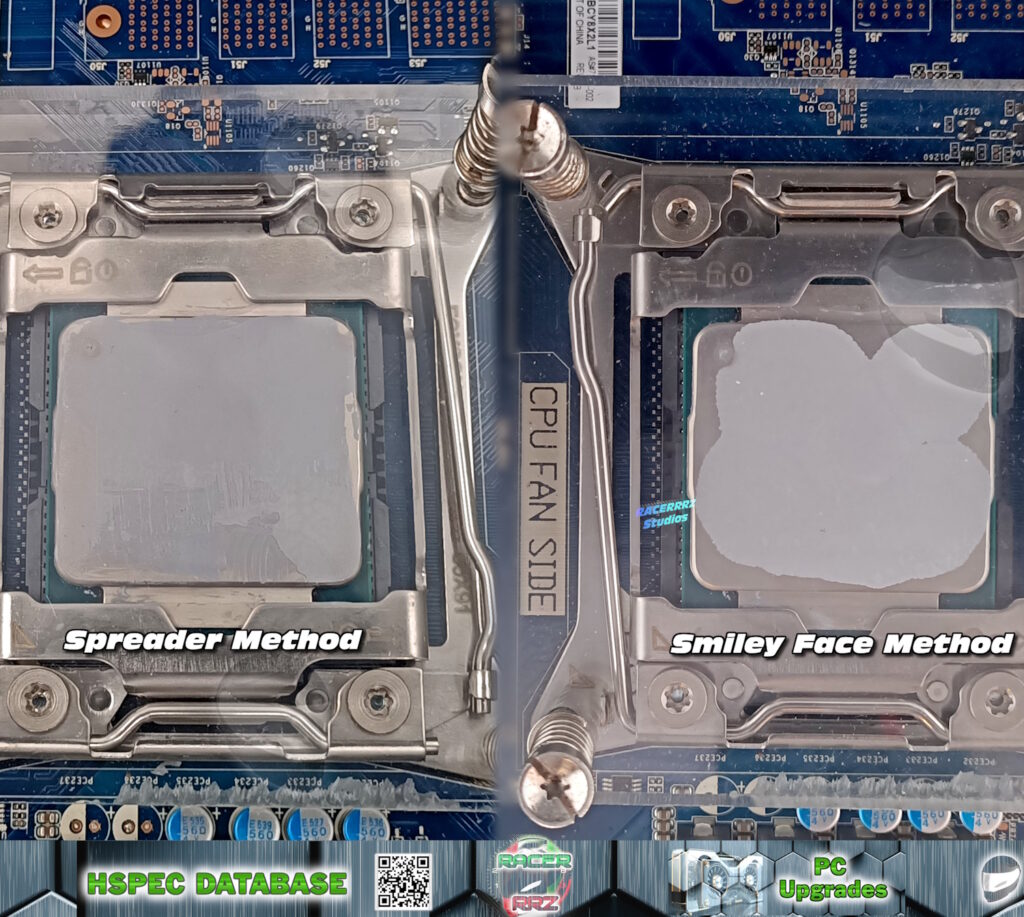
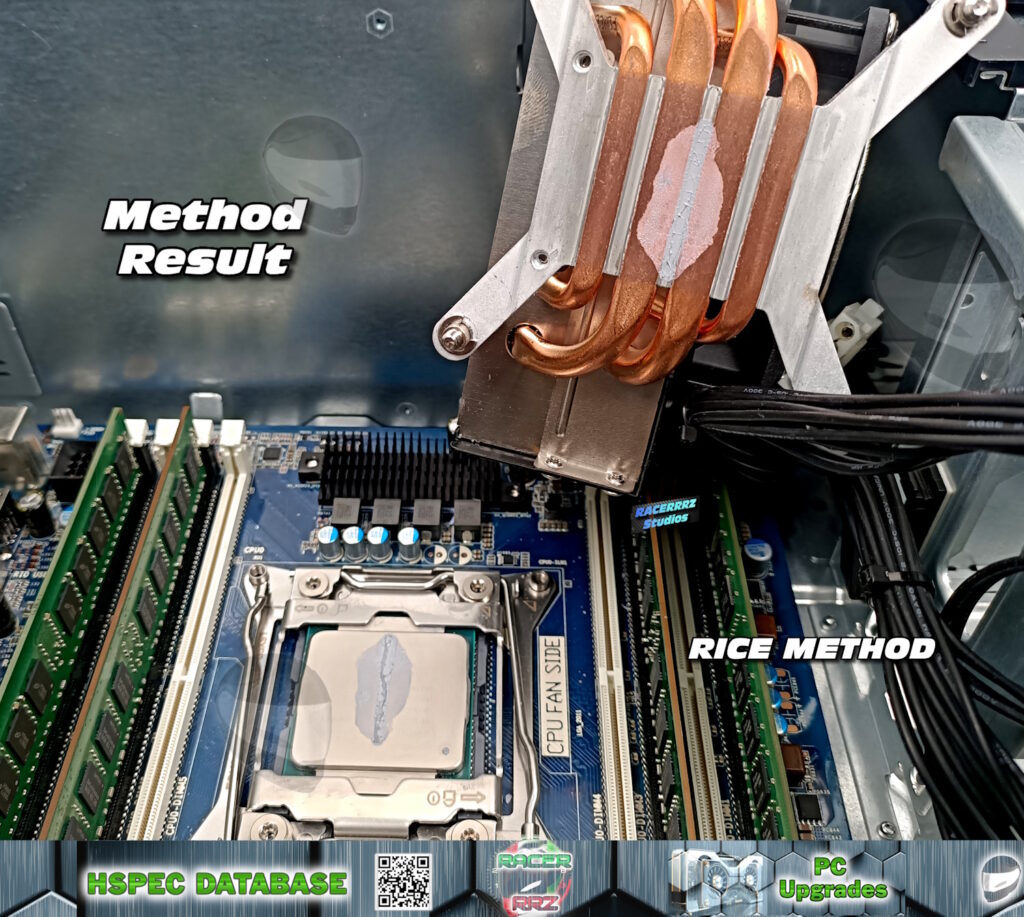
The ULTIMATE Method:
Spreader + Smiley Face Pattern + Cooler Pre-Coating
After extensive testing, the most effective method combines:
- A thin, even spread across the CPU IHS.
- A Smiley Face Pattern (small blobs to remove air pockets).
- A thin layer applied to the cooler base for full contact optimization.
This method minimizes thermal resistance by ensuring full surface coverage while preventing air entrapment.

Step-by-Step Guide to the Most Optimal Application Method
Step 1: Prepare the Surfaces
- Clean the CPU and Heatsink: Use 99% isopropyl alcohol and a lint-free microfiber cloth to remove old paste, dust, or contaminants.
- Check for Surface Imperfections: Inspect the CPU and heatsink for scratches or warping that could impact contact quality.
Step 2: Apply a Thin Base Layer Using the Spreader Method
- Place a small amount of thermal paste (approximately 0.1–0.2 mL) onto the center of the CPU IHS.
- Use a plastic spreader (or a gloved finger with a plastic cover) to evenly distribute the paste across the entire surface.
- The goal is a thin, uniform coat, just enough to obscure the metal but not so thick that excess paste squeezes out.
- This eliminates initial air gaps and ensures that no bare spots remain.
Step 3: Add the Smiley Face Pattern
- Once the base layer is smooth, apply 5 additional small dots in the shape of a smiley face:
- Two small dots for the "eyes" (near the top corners).
- One small dot for the nose (near the middle of the CPU).
- A curved line of dots for the "mouth" (spanning the lower middle area).
- These additions help displace any remaining air pockets when pressure is applied.
Step 4: Apply a Thin Layer to the Heatsink
- Not all heatsinks are equal, and more often than not there are casting defects in the CPU cooler. The best way to address this is to apply a think layer of paste to the cooler.
- Spread a very thin layer of thermal paste onto the contact surface of the heatsink using a spreader.
- This ensures that both surfaces make immediate contact and reduces the chance of voids forming when pressure is applied.
Step 5: Mount the Heatsink with Controlled Pressure
- Avoid overtightening; excessive pressure can cause uneven spread or even damage the CPU package.
- Lower the heatsink straight down onto the CPU without twisting or tilting.
- Apply even downward pressure while securing the screws in a diagonal (X-shaped) pattern to ensure uniform force distribution.
5.) What Happens If I Get It Wrong?
The Risks of Incorrect Thermal Paste Application
Applying thermal paste incorrectly can severely impact CPU temperatures, system stability, and even hardware longevity. Since thermal paste acts as a conduction bridge between the CPU’s integrated heat spreader (IHS) and the heatsink, any flaw in its application can introduce thermal inefficiencies.
Common Mistakes to Avoid
🚫 Using Too Much Paste – Leads to excessive squeeze-out and potential insulation effects.
🚫 Using Too Little Paste – Can leave air gaps and increase thermal resistance.
🚫 Not Cleaning Old Paste – Dried, degraded paste can interfere with proper heat conduction.
🚫 Uneven Heatsink Mounting – Can cause poor thermal contact and uneven spreading.
🚫 Using Non-Compatible Pastes (e.g., Liquid Metal on Aluminum) – Can corrode certain heatsinks.
Scenarios of Incorrect Thermal Paste Application & Their Consequences
🚫 Applying Too Much Thermal Paste
What Happens?
- Excess paste spills over the edges of the CPU and can potentially reach electrical contacts.
- If using electrically conductive paste (e.g., liquid metal, silver-based), this can cause short circuits and permanently damage components.
- A thick layer of paste acts as an insulator, trapping heat rather than conducting it efficiently.
Symptoms:
- Higher CPU temperatures than expected.
- Thermal throttling (CPU slows down to prevent overheating).
- Excess paste oozing out from the sides of the CPU.
Fix:
- Clean off excess paste with 99% isopropyl alcohol and reapply a thin, even layer using the Spreader + Smiley Face method for optimal coverage.
🚫 Applying Too Little Thermal Paste
What Happens?
- The CPU and heatsink don’t achieve full contact, leaving microscopic air gaps.
- Air is a poor thermal conductor (~0.025 W/m·K compared to metals at 8-400 W/m·K), resulting in uneven heat dissipation.
- This causes hotspots, increasing thermal resistance and leading to higher operating temperatures.
Symptoms:
- Extremely high CPU temperatures, even at low workloads.
- System instability (random shutdowns, freezing, or blue screen errors).
- Rapid thermal throttling under any load.
Fix:
- Remove the heatsink, clean the CPU, and apply an adequate amount of paste using the Spreader + Smiley Face method.
🚫 Uneven or Patchy Application
What Happens?
- Heat dissipation becomes inconsistent, leading to localized overheating.
- Some areas of the CPU may cool effectively, while others suffer from thermal bottlenecks.
- This problem is common with inadequate spreading methods (e.g., relying only on a central dot for large CPUs).
Symptoms:
- CPU runs at moderate to high temperatures, but performance remains inconsistent.
- Certain cores heat up faster than others, leading to uneven performance.
Fix:
- Ensure even distribution using a spread method before applying additional paste for optimal contact.
🚫 Using the Wrong Type of Thermal Paste
What Happens?
- Liquid metal paste on aluminum heatsinks can cause corrosion, permanently damaging the cooling system.
- Non-conductive pastes (e.g., ceramic-based) may not offer sufficient performance for high-end or overclocked CPUs.
Symptoms:
- Long-term degradation (e.g., liquid metal reacting with aluminum).
- Inefficient cooling, especially on high-performance setups.
Fix:
- Verify compatibility before applying thermal paste. Use liquid metal only on copper and ensure proper electrical insulation where necessary.
Worst-Case Scenarios: Permanent Damage Risks
- Repeated Overheating → CPU Degradation
- Excessive heat causes electromigration, where high temperatures accelerate atomic movement in CPU circuits, reducing lifespan.
- Continuous operation at high temperatures can cause silicon degradation, leading to system instability and eventual CPU failure.
- Short Circuits (if using conductive paste)
- Liquid metal or metal-based pastes spilling onto capacitors or motherboard traces can create electrical shorts, instantly frying components.
- Repair is rarely possible without replacing the damaged hardware.
- Thermal Cycling Stress
- Poor thermal conductivity leads to wider temperature fluctuations (hot when active, rapidly cooling when idle).
- Repeated thermal expansion/contraction weakens solder points and reduces system reliability over time.